Protect WordPress Dashboard using HTTP Authentication
WordPress is one of the most popular CMS used for websites. It is because of free availability, open-sourced, highly customizable, ease of usage, etc. Due to popularity, it is also important to keep your Website safe from intruders and BOTs. In this short guide, we will help you to protect the WordPress admin dashboard using HTTP Authentication. This guide will work on cPanel/WHM, Apache, LiteSpeed Web Servers and all .htaccess supported web servers.
It is a good practice to use very strong login credentials for the wp-admin dashboard so that it make difficult to crack, brute-force, etc for hackers and BOTS. But it is always good to have multiple layers of security on your website. Doing so is very easy by following a few steps and you will be able to protect the WordPress admin dashboard using HTTP authentication. While login credentials are a robust security measure at the WordPress application level, we can add further security using HTTP Basic Authentication (BA). HTTP BA is the simplest technique for enforcing selective restriction of access to your web resources, making it a system-level security.
There are not many requirements for setting up HTTP Authentication. Let’s proceed further.
Requirements
- Access to create files and edit .htaccess
- SSH/Terminal access to generate .htpasswd files (Optional)
Procedure
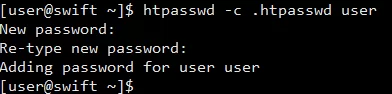
- Firstly, we will need to generate .htpasswd file which will store the username and encrypted password. If you have terminal/SSH access you can run the following command to generate .htpasswd along with user and password.
htpasswd -c .htpasswd user
.htpasswd – .htpasswd file which will store the username and encrypted password
user – is the HTTP authentication username
If you do not have terminal/SSH access you can use the .htpasswd online generator: htpasswd generator
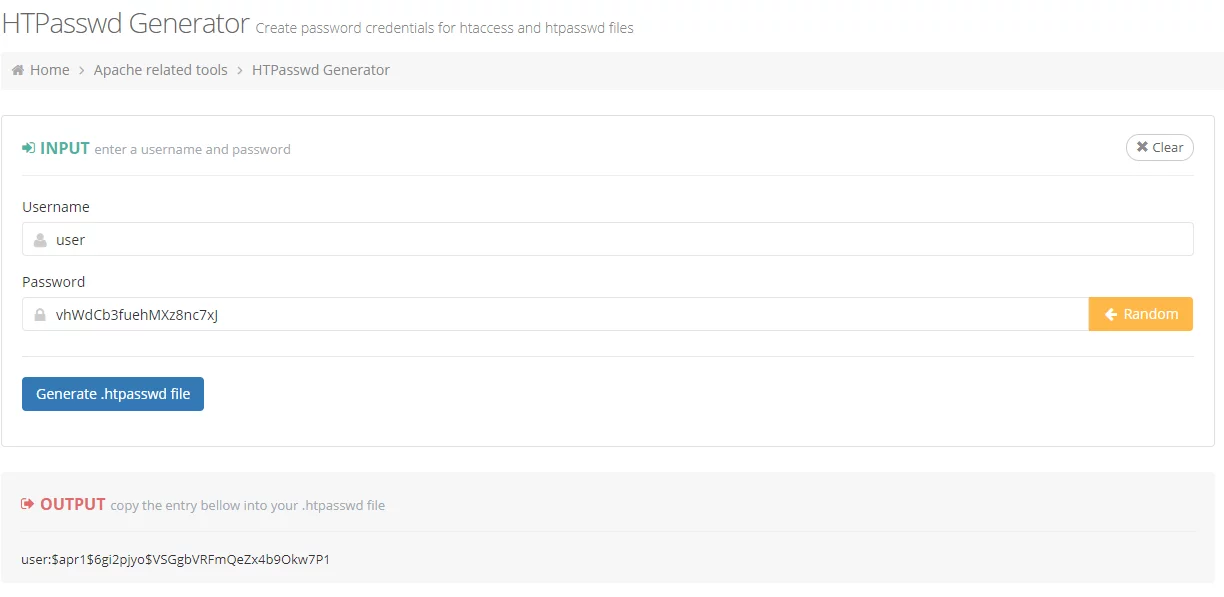
After getting the password and username in htpasswd format you can save it in .htpasswd file inside your website directory. - A typical .htpasswd file looks like this: ‘username:encrypted_password’. In our case, a sample .htpasswd file that contains
userandpasswordwould look like below image.

- After creating a .htpasswd file now we will add .htaccess rules to restrict wp-login.php file. This will add HTTP authentication on WordPress default Login page. Add the following rules in the .htaccess file after the WordPress default .htaccess rules.
<Files wp-login.php>
AuthUserFile /full/path/to/.htpasswd
AuthName "Private access"
AuthType Basic
require valid-user
</Files>
In the above snippet, you just need to focus on two lines.
AuthUserFile /full/path/to/.htpasswd: Make sure you provide the correct path to your .htpasswd file in place of ‘/full/path/to/.htpasswd’.
require valid-user: The ‘valid-user’ keyword tells web-server to provide any user mentioned in the .htpasswd file with access to the wp-login.php file. In case you want to grant selective access to the file, instead of using ‘valid-user’, you can just mention the usernames you’ll like to provide access to. For example, if there are three usernames mentioned in the .htpasswd file, out of which you want to grant access to only two users, say user1 and user2, and not to user2, you’ll use the following require directive:
require user user1 user2 - Change default WordPress .htaccess rule from
RewriteRule . /index.php [L]
to
RewriteRule ./ /index.php [L]
Note: This step is only required on Apache Web Server. - The .htaccess code should be like this. Changes are marked in bold.
# BEGIN WordPress
# The directives (lines) between `BEGIN WordPress` and `END WordPress` are
# dynamically generated, and should only be modified via WordPress filters.
# Any changes to the directives between these markers will be overwritten.
<IfModule mod_rewrite.c>
RewriteEngine On
RewriteBase /
RewriteRule ^index\.php$ - [L]
RewriteCond %{REQUEST_FILENAME} !-f
RewriteCond %{REQUEST_FILENAME} !-d
RewriteRule ./ /index.php [L] // Only Apache Web Server
</IfModule>
# END WordPress
<Files wp-login.php>
AuthUserFile /full/path/to/.htpasswd
AuthName "Private access"
AuthType Basic
require valid-user
</Files> - Once .htaccess rules are added you can save the file. And try accessing the wp-admin login page of your website and you will get a popup similar to the below image.

With these few steps, we have added a layer of protection using HTTP Authentication to Protect WordPress Dashboard.
You can block SPAM signup using BOTS on your website: Click Here
Find more WordPress related guides: Click Here
Feel free to reach us out if you need kind of assistance with cPanel, LiteSpeed, or any technical queries. Shoot us an email at technical@basezap.com, and our professional experts will get in touch with you.