Guide to enable GZIP Compression using .htaccess
Getting low PageSpeed Score on the Testing Tools for your website? PageSpeed Test tool shows a suggestion tip to enable GZIP compression for your website to improve the PageSpeed Score?
In this guide, we will show you how to enable GZIP Compression using .htaccess on your websites. Websites based on WordPress CMS are highly benefited with these GZIP Compression Headers in .htaccess.
Firstly, we should learn that what is GZIP Compression?
When a user hits your website a call is made to your server to deliver the requested files.
The bigger these files are the longer it’s going to take for them to get to your browser and appear on the screen.
Gzip compresses your web pages and style sheets before sending them over to the browser. This drastically reduces transfer time since the files are much smaller.
In terms of cost versus benefit, gzip compression should be near the top of your page speed optimizations if you don’t have it setup already.
Check If your website has GZIP Compression enabled or not.
Before you actually go and do any changes, you probably want to check whether your site’s gzipping files is already enabled for your WordPress site.
GZIP Compression Checker Tool: http://www.whatsmyip.org/http-compression-test/
If it shows “yourdomain.com is Compressed” then you do not need to enable GZIP Compression. If it says “yourdomain.com” is NOT Compressed then you need to follow the following guide.
How to enable GZIP Compression?
You will need to add the following lines to your .htaccess file and save it.
<IfModule mod_deflate.c>
# Compress HTML, CSS, JavaScript, Text, XML and fonts
AddOutputFilterByType DEFLATE application/javascript
AddOutputFilterByType DEFLATE application/rss+xml
AddOutputFilterByType DEFLATE application/vnd.ms-fontobject
AddOutputFilterByType DEFLATE application/x-font
AddOutputFilterByType DEFLATE application/x-font-opentype
AddOutputFilterByType DEFLATE application/x-font-otf
AddOutputFilterByType DEFLATE application/x-font-truetype
AddOutputFilterByType DEFLATE application/x-font-ttf
AddOutputFilterByType DEFLATE application/x-javascript
AddOutputFilterByType DEFLATE application/xhtml+xml
AddOutputFilterByType DEFLATE application/xml
AddOutputFilterByType DEFLATE font/opentype
AddOutputFilterByType DEFLATE font/otf
AddOutputFilterByType DEFLATE font/ttf
AddOutputFilterByType DEFLATE image/svg+xml
AddOutputFilterByType DEFLATE image/x-icon
AddOutputFilterByType DEFLATE text/css
AddOutputFilterByType DEFLATE text/html
AddOutputFilterByType DEFLATE text/javascript
AddOutputFilterByType DEFLATE text/plain
AddOutputFilterByType DEFLATE text/xml# Remove browser bugs (only needed for really old browsers)
BrowserMatch ^Mozilla/4 gzip-only-text/html
BrowserMatch ^Mozilla/4\.0[678] no-gzip
BrowserMatch \bMSIE !no-gzip !gzip-only-text/html
Header append Vary User-Agent
</IfModule>
After saving the .htaccess file you need to test the website on the GZIP Compressor tool if compression is enabled correctly on the website.
GZIP Compression Checker Tool: http://www.whatsmyip.org/http-compression-test/
It should show a similar output as the screenshot below if GZIP Compression is successfully enabled.
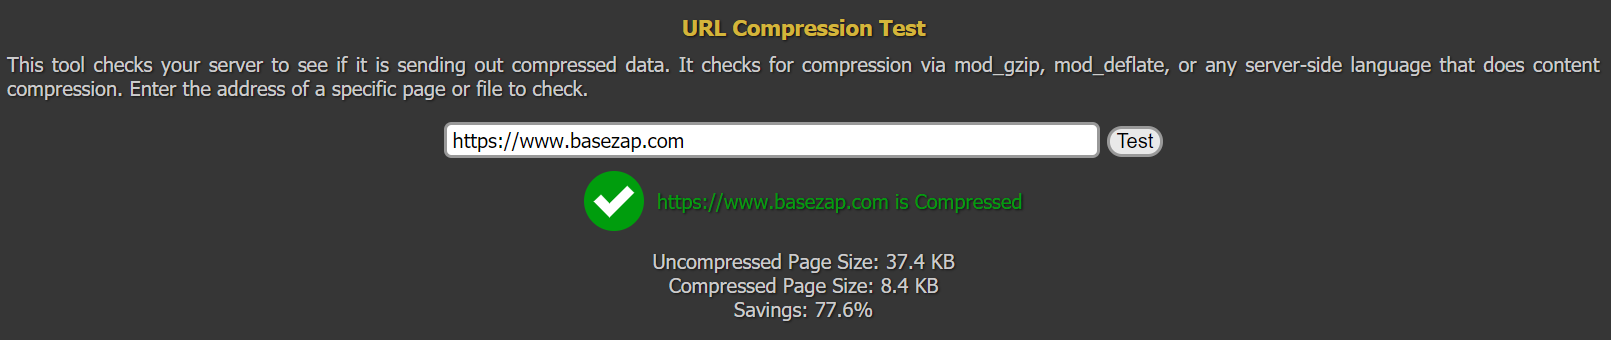
With this, we have successfully enabled GZIP Compression on the Website.
To improve the performance of the website you can also enable leverage browser caching using the following guide.