Guide to Backup and Restore Redis Database and Automate
Hello,
Today we will show how we can backup and restore Redis database and we will also show how we can automate the process of taking backup. Cronjob will be created for automation of the backup of the database on the machine locally.
Requirements
- Redis-CLI installed on Linux Machine
- Redis Server Running
- Root Access to Machine
- Redis Authentication Password if its set. Get it from here on your machine.
Redis configuration file – /etc/redis/redis.conf
Procedure
Backup
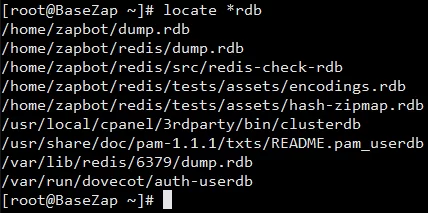
- Locate you redis database directory using
locate *rdb
or
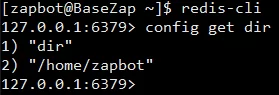
start Redis-CLIredis-cli auth master_password
config get dirNote – Use auth master_password only if you have set it for your redis-server else, skip that command.
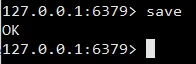
Note – auth master_password is used to authenticate the redis cli session, you can skip if you are not using any master password - Save the progress at current stage using save command in redis-cli
save
- Navigate to your database directory that is shown above in #1. For us its /home/zapbot/
cd /home/zapbot
- In your database directory, you can see dump.rdb file and if you have enabled ‘appendonly’ then you can see appendonly.aof file along with the database. So these two files have to be backed up. In our case, we don’t have aof file but commands to backup are same as rdb file.
- Run this command to store the backup
sudo cp /home/zapbot/dump.rdb /home/backup/
Note – Location may vary from user to user because it depends on the configuration done by the user.
- Your Redis database is backed up in /home/backup/ directory.
Automation of Backup
We will now configure automatic backup of Redis Database using cronjob which will run at specific intervals automatically. There are many automatic backup tools available but we will use modern tool rdiff-backup. Here we start.
- Install rdiff-backup on your machine using
sudo yum install rdiff-backup
- Verify rdiff-backup installed properly
rdiff-backup –version

- To test, runun this command which similarly backup up the .rdb and .aof file itself to selected directory
sudo rdiff-backup –preserve-numerical-ids /home/zapbot /home/backup/redis/
Note –
–preserve-numerical-ids, the ownership of the source and destination folders will be the same.
In above command we are using /home/backup/redis as backup directory, only this is different from cp command. - Now its time for creating cronjob for automatic backup using rdiff-backup. Run,
sudo crontab -e
Paste the following there and save it
0 0 * * * rdiff-backup –preserve-numerical-ids –no-file-statistics /home/zapbot /home/backup/redis/
Note –
This Cron entry will perform a Redis backup every day at midnight.
–no-file-statistics switch will disable writing to the file_statistics file in the rdiff-backup-data directory, which will make rdiff-backup run more quickly and use up a bit less disk space. - Backup will be saved to your desired directory and you can check it using
ls -l /home/backup/redis
Restore
- Stop Redis Server
sudo service redis-server stop
or
sudo killall -9 redis-server
- Turn off appendonly if its enabled in /etc/redis/redis.conf
appendonly no
- Copy Backup Database to working dir
sudo cp -p /home/backup/redis/dump.rdb /home/zapbot/redis/
Note – /home/backup/redis/dump.rdb is our redis database that we created and /home/zapbot/redis/ is our redis database working directory
- You can also use rdiff-backup to restore the backup instead above cp command, Run as below
sudo rdiff-backup -r now /home/backup/redis/dump.rdb /home/zapbot/redis/
- Set permissions to the database if your directory is /var/lib/redis/ , we will skip chown command because we are using local directory for database
sudo chown redis:redis /var/lib/redis/dump.rdb
sudo chmod 660 /var/lib/redis/dump.rdb - Start Redis Server to resume your work
sudo service redis-server start
- If you need to enable appendonly then log in to redis-cli and running following command,
BGREWRITEAOF - Stop Redis Server by repeating #1
- Turn on appendonly if its enabled in /etc/redis/redis.conf
appendonly yes
- Start Redis Server to resume your work
sudo service redis-server start
So herenow we have finished this brief guide to backup manually and automated alongwith the restoration process.