Create LVM using Striping I/O for more IOPS performance
LVM is a tool first introduced in Fedora Linux for Logical Volume Management which allows useful feature likes allocating disks, striping, mirroring and resizing logical volumes. LVM reduces the tedious work of manual disk management on the servers and Linux systems. This guide will explain how we can create LVM using Striping I/O for more IOPS performance. LVM Striping is one of the features which will write the data over multiple disks instead of constantly writing on a single Physical volume. This will help to reduce the Disk IO Wait, which caused huge load spikes on the system. If we see in terms of speed, LVM Striping roughly gives double the IOPS than LVM Linear.
Assume we have two disk drives and pointed to two physical volumes; if each physical volume is capable of 100 IOPS totally our volume group will get 200 IOPS with LVM Striping, but with LVM Linear, we will get only 100 IOPS for both disks in LVM and no matter how many disks we add in LVM.
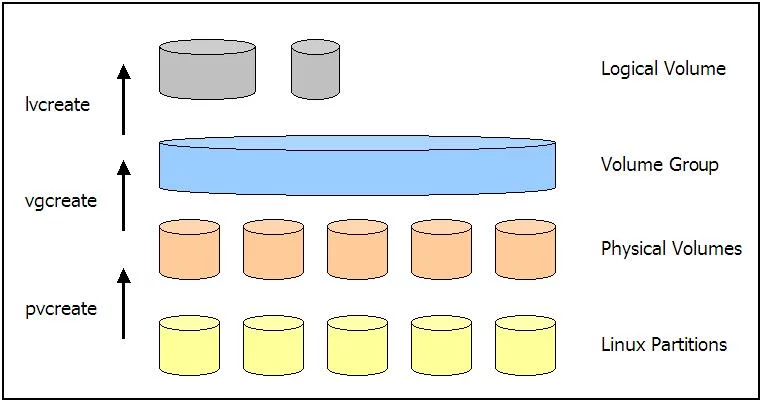
Below is a basic diagrammatic and visual expression of LVM
         sda1  sdb1    (Physical Volumes on partitions or whole disks)
           \    /
            \  /
           VG-SSD      (Volume Group)
           / | \
         /   |   \
      home boot  tmp   (Logical Volumes)
       |     |    |
      ext4  ext3 ext4  (File Systems)
LVM Striping features can be summed up to the following:
- Increases the performance of disks by increasing I/O.
- Reduces Disk IO Wait by writing data over multiple disks simultaneously.
- Disk fill-up can be reduced using striping over multiple disks.
Let’s now proceed to learn how we can create LVM using Striping I/O for more IOPS performance.
Requirments
- Root access to Linux System with Additional Disks attached.
Procedure
- Check disks attached to the system using the command
lsblk.
We have a 6 x 2TB disk with max-supported IOPS of 600 attached to our system. With Striping I/O LVM, we will get 6*600 IOPS or at least a value of approximately 3400-3500.#> lsblk NAME MAJ:MIN RM SIZE RO TYPE MOUNTPOINT sda 8:0 0 100G 0 disk sda1 8:1 0 100G 0 part sdb 8:16 0 1.9T 0 disk sdc 8:32 0 1.9T 0 disk sdd 8:48 0 1.9T 0 disk sde 8:64 0 1.9T 0 disk sdf 8:80 0 1.9T 0 disk sdg 8:96 0 1.9T 0 disk
Here,
sdais the main 100GB disk andsda1root partition,sd[b-g]are the attached HDD disks.sd[b-g]Means all disk sdb to sbg. - Create the Physical Volume (PV) using the command
pvcreate /dev/sd[b-g].#> pvcreate /dev/sd[b-g] Physical volume "/dev/sdb" successfully created. Physical volume "/dev/sdc" successfully created. Physical volume "/dev/sdd" successfully created. Physical volume "/dev/sde" successfully created. Physical volume "/dev/sdf" successfully created. Physical volume "/dev/sdg" successfully created.
- Confirm PV status using the command
pvs.#> pvs PV VG Fmt Attr PSize PFree /dev/vdb lvm2 --- 1.91t 1.91t /dev/vdc lvm2 --- 1.91t 1.91t /dev/vdd lvm2 --- 1.91t 1.91t /dev/vde lvm2 --- 1.91t 1.91t /dev/vdf lvm2 --- 1.91t 1.91t /dev/vdg lvm2 --- 1.91t 1.91t
- Create the Volume Group (VG) using the command
vgcreate -s 1M vgbz /dev/sd[b-g] -v.#> vgcreate -s 1M vgbz /dev/sd[b-g] -v Wiping internal VG cache Wiping cache of LVM-capable devices Wiping signatures on new PV /dev/sdb. Wiping signatures on new PV /dev/sdc. Wiping signatures on new PV /dev/sdd. Wiping signatures on new PV /dev/sde. Wiping signatures on new PV /dev/sdf. Wiping signatures on new PV /dev/sdg. Adding physical volume '/dev/sdb' to volume group 'vgbz' Adding physical volume '/dev/sdc' to volume group 'vgbz' Adding physical volume '/dev/sdd' to volume group 'vgbz' Adding physical volume '/dev/sde' to volume group 'vgbz' Adding physical volume '/dev/sdf' to volume group 'vgbz' Adding physical volume '/dev/sdg' to volume group 'vgbz' Archiving volume group "vgbz" metadata (seqno 0). Creating volume group backup "/dev/vgbz" (seqno 1). Volume group "vgbz" successfully created
- Confirm Volume Group (VG) status using the command
vgdisplay -v.#> vgdisplay -v --- Volume group --- VG Name vgbz System ID Format lvm2 Metadata Areas 2 Metadata Sequence No 2 VG Access read/write VG Status resizable MAX LV 0 Cur LV 1 Open LV 1 Max PV 0 Cur PV 2 Act PV 2 VG Size 11.46 TiB PE Size 1.00 MiB Total PE 12259804 Alloc PE / Size 0 / 0 Free PE / Size 12259804 / 11.46 TiB VG UUID erxpzQ-MRe9-Tivg-p7d5-eOZc-XCsj-d3v2eF
- Volume Group (VG) is now ready, its time to create Logical Volume (VG) using the command
lvcreate -L 11.46T -I 16k -i 6 -n storage vgbz.#> lvcreate -L 11.46T -I 128k -i 6 -n storage vgbz Rounding size 11.40 TiB (12259804 extents) up to stripe boundary size 11.40 TiB (12259804 extents). Logical volume "storage" created.
-L Volume size
-I Strip size
-i Equivalent to the number of disks
-n LV name
vgbz volume group to useCheck Logical Volume complete view using
lvdisplay -mwhere you will see Stripes as 6, which is a total of 6 disks attached to Strip LVM along with a Strip size of 128 KB.#> lvdisplay -m --- Logical volume --- LV Path /dev/vgdisk/storage LV Name storage VG Name vgdisk LV UUID OyOR31-sIO3-FOPF-QJoK-pmGw-l4qB-v3l5LA LV Write Access read/write LV Creation host, time server.basezap.com, 2021-04-30 01:16:09 +0530 LV Status available # open 1 LV Size 11.40 TiB Current LE 12259804 Segments 1 Allocation inherit Read ahead sectors auto - currently set to 8192 Block device 253:2 --- Segments --- Logical extents 0 to 12259804: Type striped Stripes 6 Stripe size 128.00 KiB - Now, we can format the Logical Volume using the command
mkfs.ext4for the ext4 partition.#> mkfs.ext4 /dev/mapper/vgdisk-storage
- Following mount point options can be used in
/etc/fstab./dev/mapper/vgdisk-storage /storage ext4 defaults 1 2
- We can check IO Benchmarks using the command
fio.#> fio --randrepeat=1 --name=randrw --rw=randrw --direct=1 --ioengine=libaio --bs=16k --numjobs=10 --size=512M --runtime=60 --time_based --iodepth=64 --group_reporting
Results:
read : io=1467.8MB, bw=54679KB/s, iops=1782, runt= 60903msec
slat (usec): min=3, max=1362.7K, avg=148.74, stdev=8772.92
clat (msec): min=2, max=6610, avg=233.47, stdev=356.86
lat (msec): min=2, max=6610, avg=233.62, stdev=357.65
write: io=1465.1MB, bw=54634KB/s, iops=1779, runt= 60903msec
slat (usec): min=4, max=1308.1K, avg=162.97, stdev=8196.09
clat (usec): min=551, max=5518.4K, avg=180989.83, stdev=316690.67
lat (usec): min=573, max=5526.4K, avg=181152.80, stdev=317708.30
We achieved desired IOPS of ~3.5k of the total by LVM Striping rather than the LVM Linear IOPS of 600 of the total, which can be seen in the above fio I/O benchmark results.
If you want to Extend EXT2/3/4 and XFS root partition, you can find the following guide helpful.
Extend EXT2/3/4 and XFS root partition without LVM