20 Virsh Commands for Managing VMs | Virsh CLI Guide
Virsh Useful Commands for Managing Virtual Machines

Introduction
Virsh is a powerful command-line utility for managing virtual machines (VMs) that are controlled by libvirt, the virtualization management library. It provides a wide range of commands to create, edit, monitor, and control VMs running on hypervisors like KVM, Xen, and more. In this blog post, we’ll explore some of the most useful virsh commands that every system administrator should know.
Listing and Monitoring VMs
To get started, let’s look at some basic commands for listing and monitoring VMs:
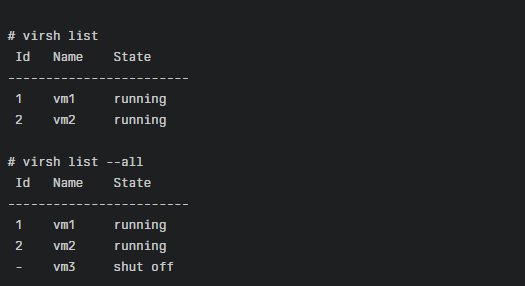
virsh list– Lists all running VMs. Add the--alloption to include inactive VMs as well.
Example:
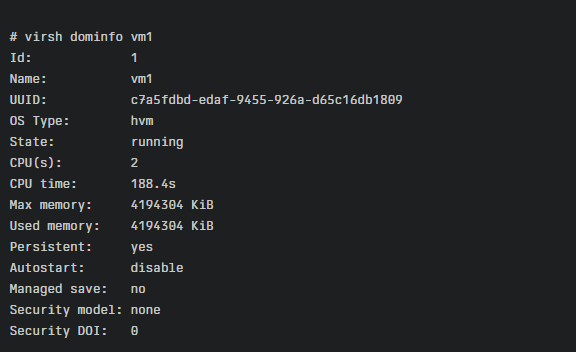
virsh dominfo VM_NAME– Displays detailed information about a specific VM, including its state, CPU/memory usage, and more.
Example:
virsh domstate VM_NAME– Shows the current state of a VM (running, paused, shut off, etc.).
Example:
virsh domstats VM_NAME– Provides statistics about a VM’s CPU, memory, disk, and network usage.
Example:
Controlling VM State
Virsh allows you to easily control the state of your VMs with the following commands:
virsh start VM_NAME– Starts an inactive VM.
Example:
virsh shutdown VM_NAME– Gracefully shuts down a running VM.
Example:
virsh destroy VM_NAME– Forcefully stops a VM, similar to pulling the power plug. Use with caution!
Example:
virsh reboot VM_NAME– Reboots a running VM.
Example:
virsh suspend VM_NAME– Suspends a running VM, saving its state to disk.
Example:
virsh resume VM_NAME– Resumes a suspended VM.
Example:
Editing VM Configuration
To modify the configuration of a VM, you can use the following commands:
virsh edit VM_NAME– Opens the XML configuration file of a VM in your default text editor. Make sure to only edit VMs that are powered off.
Example:
This will open the XML configuration in a text editor.
virsh setvcpus VM_NAME COUNT– Changes the number of virtual CPUs assigned to a VM. The VM needs to be powered off for this to take effect.
Example:
virsh setmem VM_NAME SIZE– Modifies the memory allocated to a VM in kilobytes. The new size cannot exceed the initial memory defined for the VM.
Example:
Managing Storage and Networking
Virsh provides commands to manage storage and networking for your VMs:
virsh attach-disk VM_NAME SOURCE_PATH TARGET_DEV– Attaches a new disk device to a VM.
Example:
virsh detach-disk VM_NAME TARGET_DEV– Detaches a disk device from a VM.
Example:
virsh attach-interface VM_NAME NETWORK– Attaches a new network interface to a VM.
Example:
virsh detach-interface VM_NAME INTERFACE_TYPE– Detaches a network interface from a VM.
Example:
Additional Useful Commands in Virsh
Here are some more virsh commands that can be handy for managing your VMs:
virsh qemu-monitor-command VM_NAME --hmp "block_resize drive-virtio-disk0 SIZE_IN_GB G"– Modifies the disk space allocated to a VM.
Example:
virsh set-user-password VM_NAME USER_NAME NEW_PASSWORD– Changes the password of a user inside a VM, including the root user.
Example:
virsh set-guest-hostname VM_NAME NEW_HOSTNAME– Changes the hostname of a VM.
Example:
virsh autostart --disable VM_NAME– Disables autostart for a VM, preventing it from automatically starting when the host boots.
Example:
virsh domexec VM_NAME COMMAND– Runs a command inside a VM.
Example:
- The location of the log file for a specific VM:
tail -f /var/log/libvirt/qemu/vm1.log
Conclusion
Virsh is an essential tool for any system administrator managing virtual machines with libvirt. With the commands covered in this blog post, you can efficiently list, monitor, control, and modify your VMs from the command line. Mastering virsh will greatly simplify your virtualization management tasks and boost your productivity. Experiment with these commands in a test environment and refer to the virsh manual pages for more advanced usage and options.
Related Content: OpenVZ Useful Commands


